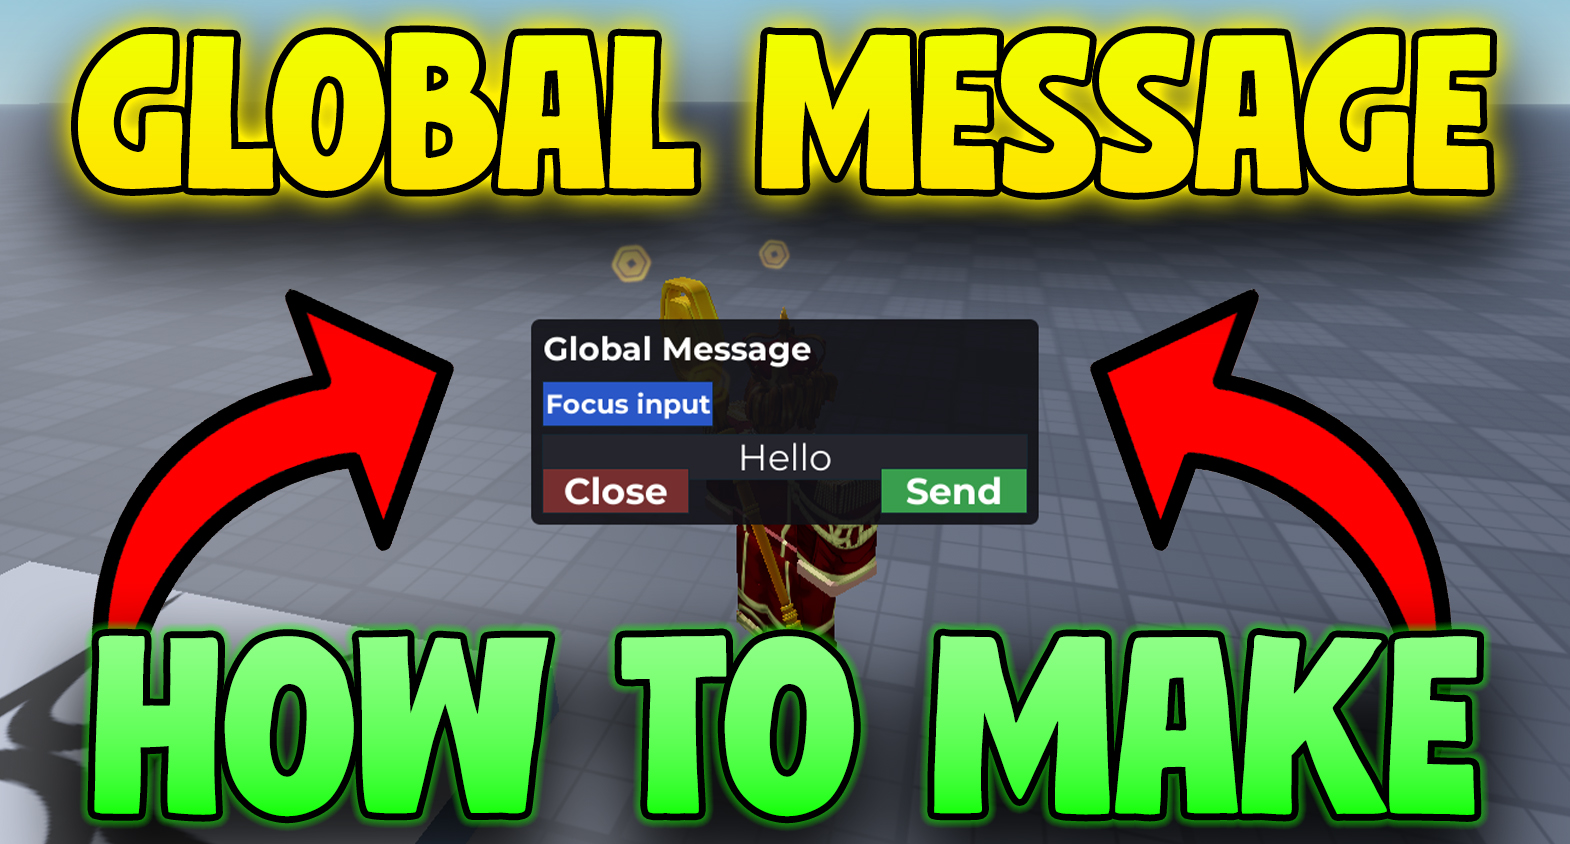
How to Make Admin Abuse Events in Roblox Studio (Copy & Paste)

This guide shows how to make admin abuse events in Roblox Studio: a compact toast popup, an F2 control panel with two tabs
(Announcement & Admin), and a stackable Server Luck ×2 that resets a 5:00 timer and syncs across servers. The included LuckManager
uses MessagingService and
DataStoreService in live games, and safely no-ops in Studio so you won’t see API errors while testing.
Create required objects (exact names)
ReplicatedStorage: add four RemoteEvents
- GlobalMessage
- AdminGlobalMessage
- AdminAction
- LuckUpdate
ServerScriptService
- ModuleScript named LuckManager
- Script named AdminPanelServer
StarterPlayer ▸ StarterPlayerScripts
- LocalScript named AdminPanelClient
That’s it for hierarchy. Don’t add other remotes/scripts for this feature.
Server ModuleScript: LuckManager (cross-server, Studio-safe)
The LuckManager doubles the server multiplier and resets a 5-minute expiry. It persists in DataStore, broadcasts updates with MessagingService, and auto-expires back to 1×. In Studio, it runs locally and skips API calls.
-- ServerScriptService/LuckManager (ModuleScript)
-- Global luck that doubles on demand and resets to 5:00. Cross-server in live games,
-- safe no-op for Studio (no DataStore/Messaging errors).

local RunService        = game:GetService("RunService")
local MessagingService  = game:GetService("MessagingService")
local DataStoreService  = game:GetService("DataStoreService")

local LUCK_TOPIC    = "GLOBAL_LUCK_V1"
local LUCK_DS       = DataStoreService:GetDataStore("LuckStateV1")
local DEFAULT_MULT  = 1
local DURATION_SECS = 5 * 60 -- 5 minutes
local IS_STUDIO     = RunService:IsStudio()

local State = { multiplier = DEFAULT_MULT, expiresAt = 0 } -- os.time()
local Subscribers = {}

local function now() return os.time() end
local function secondsRemaining() return math.max(0, State.expiresAt - now()) end

local function pushLocal()
	for _, cb in ipairs(Subscribers) do
		task.spawn(cb, State.multiplier, secondsRemaining())
	end
end

local function applyState(mult, exp)
	State.multiplier = mult
	State.expiresAt  = exp
	pushLocal()
end

local function persist()
	if IS_STUDIO then return end
	local ok, err = pcall(function()
		LUCK_DS:SetAsync("state", { multiplier = State.multiplier, expiresAt = State.expiresAt })
	end)
	if not ok then warn("[Luck] Persist failed:", err) end
end

local function publish()
	if IS_STUDIO then return end
	local ok, err = pcall(function()
		MessagingService:PublishAsync(LUCK_TOPIC, {
			multiplier = State.multiplier,
			expiresAt  = State.expiresAt,
			t          = now(),
		})
	end)
	if not ok then warn("[Luck] Publish failed:", err) end
end

local function load()
	if IS_STUDIO then
		applyState(DEFAULT_MULT, 0)
		return
	end
	local ok, data = pcall(function() return LUCK_DS:GetAsync("state") end)
	if ok and typeof(data) == "table" then
		applyState(tonumber(data.multiplier) or DEFAULT_MULT, tonumber(data.expiresAt) or 0)
	else
		applyState(DEFAULT_MULT, 0)
	end
end

local function subscribe()
	if IS_STUDIO then return end
	local ok, sub = pcall(function()
		return MessagingService:SubscribeAsync(LUCK_TOPIC, function(msg)
			local d = msg.Data
			if typeof(d) ~= "table" then return end
			if typeof(d.multiplier) ~= "number" or typeof(d.expiresAt) ~= "number" then return end
			applyState(d.multiplier, d.expiresAt)
		end)
	end)
	if not ok then warn("[Luck] Subscribe failed:", sub) end
end

local M = {}

function M.Init()
	load()
	subscribe()
end

function M.OnChanged(cb)
	table.insert(Subscribers, cb)
	task.defer(cb, State.multiplier, secondsRemaining())
end

function M.Get()
	return State.multiplier, secondsRemaining()
end

function M.DoubleAndReset()
	local newMult = math.clamp(State.multiplier * 2, 1, 2^30)
	local newExp  = now() + DURATION_SECS
	applyState(newMult, newExp)
	persist()
	publish()
end

function M.Tick()
	if secondsRemaining() <= 0 and State.multiplier ~= DEFAULT_MULT then
		applyState(DEFAULT_MULT, 0)
		persist()
		publish()
	end
end

return M
Server Script: AdminPanelServer
Handles announcements, the “Server Luck ×2” admin action, and pushes Luck HUD updates to all clients.
-- ServerScriptService/AdminPanelServer
-- Handles announcements, server-luck actions, and pushes Luck HUD updates.

local ReplicatedStorage = game:GetService("ReplicatedStorage")
local Players = game:GetService("Players")

local LuckManager   = require(script.Parent:WaitForChild("LuckManager"))
local EVT_SEND_ANN  = ReplicatedStorage:WaitForChild("AdminGlobalMessage")
local EVT_BROADCAST = ReplicatedStorage:WaitForChild("GlobalMessage")
local EVT_ADMIN_ACT = ReplicatedStorage:WaitForChild("AdminAction")
local EVT_LUCK_PUSH = ReplicatedStorage:WaitForChild("LuckUpdate")

-- Init luck system
LuckManager.Init()
LuckManager.OnChanged(function(mult, secondsLeft)
	EVT_LUCK_PUSH:FireAllClients(mult, secondsLeft)
end)

-- Expire loop
task.spawn(function()
	while true do
		LuckManager.Tick()
		task.wait(1)
	end
end)

-- Helpers
local function sanitize(s, maxLen)
	s = tostring(s or ""):gsub("^%s+",""):gsub("%s+$",""):gsub("[%c]"," ")
	if maxLen and #s > maxLen then s = s:sub(1, maxLen) end
	return s
end

-- Announcements (no admin gate by request)
local COOLDOWN_ANN, MAX_LEN_ANN = 2.0, 200
local lastAnn = {}

EVT_SEND_ANN.OnServerEvent:Connect(function(player, text, color)
	local t = os.clock()
	if (t - (lastAnn[player] or 0)) < COOLDOWN_ANN then return end
	lastAnn[player] = t

	text = sanitize(text, MAX_LEN_ANN)
	if text == "" then return end
	if typeof(color) ~= "Color3" then color = nil end

	EVT_BROADCAST:FireAllClients(text, color)
end)

-- “Admin abuse” actions
local lastAct, COOLDOWN_ACT = {}, 2.0

EVT_ADMIN_ACT.OnServerEvent:Connect(function(player, action, payload)
	local t = os.clock()
	if (t - (lastAct[player] or 0)) < COOLDOWN_ACT then return end
	lastAct[player] = t

	if action == "DoubleLuck" then
		LuckManager.DoubleAndReset()
		local mult = select(1, LuckManager.Get())
		EVT_BROADCAST:FireAllClients(
			("global announcement: server luck doubled (x%d)"):format(mult),
			Color3.fromRGB(120, 220, 120) -- green
		)
	end
end)

-- Push current luck to newly joined players
Players.PlayerAdded:Connect(function(plr)
	local mult, secs = LuckManager.Get()
	EVT_LUCK_PUSH:FireClient(plr, mult, secs)
end)
Client LocalScript: AdminPanelClient
Builds the higher-on-screen toast, an F2 control panel with two tabs (Announcement/Admin), and a bottom-right Luck HUD with a live countdown.
-- StarterPlayerScripts/AdminPanelClient (LocalScript)
-- Control panel (F2), toast popup, bottom-right Luck HUD, draggable panel.
local ReplicatedStorage = game:GetService("ReplicatedStorage")
local TweenService = game:GetService("TweenService")
local UserInputService = game:GetService("UserInputService")
local Players = game:GetService("Players")
local RunService = game:GetService("RunService")
local player = Players.LocalPlayer
local EVT_SEND_ANN = ReplicatedStorage:WaitForChild("AdminGlobalMessage")
local EVT_BROADCAST = ReplicatedStorage:WaitForChild("GlobalMessage")
local EVT_ADMIN_ACT = ReplicatedStorage:WaitForChild("AdminAction")
local EVT_LUCK_PUSH = ReplicatedStorage:WaitForChild("LuckUpdate")
-- ========= Toast popup (higher on screen: ~3rd quarter) =========
local toastGui = Instance.new("ScreenGui")
toastGui.Name = "Toast"
toastGui.IgnoreGuiInset = true
toastGui.ResetOnSpawn = false
toastGui.DisplayOrder = 1500
toastGui.Parent = player:WaitForChild("PlayerGui")
local TOAST_WIDTH = 520
local TOAST_HEIGHT = 64
local TOAST_Y_REST = 0.32 -- 32% from top
local TOAST_Y_START = TOAST_Y_REST + 0.03
local toast = Instance.new("Frame")
toast.Name = "Popup"
toast.Size = UDim2.new(0, TOAST_WIDTH, 0, TOAST_HEIGHT)
toast.Position = UDim2.new(0.5, -TOAST_WIDTH/2, TOAST_Y_REST, 0)
toast.BackgroundColor3 = Color3.fromRGB(30, 30, 34)
toast.BackgroundTransparency = 0.15
toast.Visible = false
toast.Parent = toastGui
Instance.new("UICorner", toast).CornerRadius = UDim.new(0, 12)
local toastLabel = Instance.new("TextLabel")
toastLabel.BackgroundTransparency = 1
toastLabel.Size = UDim2.new(1, -24, 1, 0)
toastLabel.Position = UDim2.new(0, 12, 0, 0)
toastLabel.TextScaled = true
toastLabel.Font = Enum.Font.GothamBold
toastLabel.TextColor3 = Color3.new(1,1,1)
toastLabel.TextStrokeTransparency = 0.5
toastLabel.Text = ""
toastLabel.Parent = toast
local function showToast(text, color)
toastLabel.Text = text
toastLabel.TextColor3 = color or Color3.new(1,1,1)
toast.Visible = true
toast.Position = UDim2.new(0.5, -TOAST_WIDTH/2, TOAST_Y_START, 0)
toast.BackgroundTransparency = 0.35
toastLabel.TextTransparency = 1
TweenService:Create(toast, TweenInfo.new(0.18, Enum.EasingStyle.Quad, Enum.EasingDirection.Out),
{ Position = UDim2.new(0.5, -TOAST_WIDTH/2, TOAST_Y_REST, 0), BackgroundTransparency = 0.15 } ):Play()
TweenService:Create(toastLabel, TweenInfo.new(0.18, Enum.EasingStyle.Quad), { TextTransparency = 0 }):Play()
task.wait(2.0)
TweenService:Create(toast, TweenInfo.new(0.18, Enum.EasingStyle.Quad, Enum.EasingDirection.In),
{ BackgroundTransparency = 0.5 } ):Play()
TweenService:Create(toastLabel, TweenInfo.new(0.18, Enum.EasingStyle.Quad), { TextTransparency = 1 }):Play()
task.wait(0.2)
toast.Visible = false
end
EVT_BROADCAST.OnClientEvent:Connect(showToast)
-- ========= Control Panel (F2) =========
local gui = Instance.new("ScreenGui")
gui.Name = "ControlPanel"
gui.IgnoreGuiInset = true
gui.ResetOnSpawn = false
gui.DisplayOrder = 2000
gui.Enabled = false
gui.Parent = player.PlayerGui
local panel = Instance.new("Frame")
panel.Size = UDim2.new(0, 600, 0, 340)
panel.Position = UDim2.new(0.5, -300, 0.5, -170)
panel.BackgroundColor3 = Color3.fromRGB(18,18,22)
panel.BackgroundTransparency = 0.05
panel.Parent = gui
Instance.new("UICorner", panel).CornerRadius = UDim.new(0, 12)
-- Title + close X
local title = Instance.new("TextLabel")
title.BackgroundTransparency = 1
title.Size = UDim2.new(1, -48, 0, 44)
title.Position = UDim2.new(0, 12, 0, 4)
title.Text = "Control Panel"
title.TextScaled = true
title.Font = Enum.Font.GothamBold
title.TextXAlignment = Enum.TextXAlignment.Left
title.TextColor3 = Color3.new(1,1,1)
title.Parent = panel
local closeBtn = Instance.new("TextButton")
closeBtn.Size = UDim2.new(0, 36, 0, 36)
closeBtn.Position = UDim2.new(1, -44, 0, 6)
closeBtn.Text = "X"
closeBtn.TextScaled = true
closeBtn.BackgroundColor3 = Color3.fromRGB(140,50,50)
closeBtn.TextColor3 = Color3.new(1,1,1)
closeBtn.Font = Enum.Font.GothamBold
closeBtn.Parent = panel
Instance.new("UICorner", closeBtn).CornerRadius = UDim.new(0, 10)
closeBtn.MouseButton1Click:Connect(function() gui.Enabled = false end)
-- Tabs
local tabs = Instance.new("Frame")
tabs.Size = UDim2.new(1, -24, 0, 40)
tabs.Position = UDim2.new(0, 12, 0, 52)
tabs.BackgroundTransparency = 1
tabs.Parent = panel
local tabAnn = Instance.new("TextButton")
tabAnn.Size = UDim2.new(0, 160, 1, 0)
tabAnn.Position = UDim2.new(0, 0, 0, 0)
tabAnn.Text = "Announcement"
tabAnn.TextScaled = true
tabAnn.Font = Enum.Font.GothamBold
tabAnn.TextColor3 = Color3.new(1,1,1)
tabAnn.BackgroundColor3 = Color3.fromRGB(38,38,46)
tabAnn.Parent = tabs
Instance.new("UICorner", tabAnn).CornerRadius = UDim.new(0, 8)
local tabAdmin = Instance.new("TextButton")
tabAdmin.Size = UDim2.new(0, 120, 1, 0)
tabAdmin.Position = UDim2.new(0, 170, 0, 0)
tabAdmin.Text = "Admin"
tabAdmin.TextScaled = true
tabAdmin.Font = Enum.Font.GothamBold
tabAdmin.TextColor3 = Color3.new(1,1,1)
tabAdmin.BackgroundColor3 = Color3.fromRGB(38,38,46)
tabAdmin.Parent = tabs
Instance.new("UICorner", tabAdmin).CornerRadius = UDim.new(0, 8)
-- Content pages
local content = Instance.new("Frame")
content.Size = UDim2.new(1, -24, 1, -124)
content.Position = UDim2.new(0, 12, 0, 96)
content.BackgroundTransparency = 1
content.Parent = panel
local pageAnn = Instance.new("Frame")
pageAnn.Size = UDim2.new(1, 0, 1, 0)
pageAnn.BackgroundTransparency = 1
pageAnn.Parent = content
local pageAdmin = Instance.new("Frame")
pageAdmin.Size = UDim2.new(1, 0, 1, 0)
pageAdmin.BackgroundTransparency = 1
pageAdmin.Visible = false
pageAdmin.Parent = content
local function showPage(which)
pageAnn.Visible = (which == "ann")
pageAdmin.Visible = (which == "admin")
tabAnn.BackgroundColor3 = (which=="ann") and Color3.fromRGB(70,120,220) or Color3.fromRGB(38,38,46)
tabAdmin.BackgroundColor3 = (which=="admin") and Color3.fromRGB(70,120,220) or Color3.fromRGB(38,38,46)
end
tabAnn.MouseButton1Click:Connect(function() showPage("ann") end)
tabAdmin.MouseButton1Click:Connect(function() showPage("admin") end)
showPage("ann")
-- Announcement page
local annCard = Instance.new("Frame")
annCard.Size = UDim2.new(1, 0, 0, 140)
annCard.BackgroundColor3 = Color3.fromRGB(28,28,36)
annCard.Parent = pageAnn
Instance.new("UICorner", annCard).CornerRadius = UDim.new(0, 10)
local annLabel = Instance.new("TextLabel")
annLabel.BackgroundTransparency = 1
annLabel.Size = UDim2.new(1, -14, 0, 28)
annLabel.Position = UDim2.new(0, 7, 0, 8)
annLabel.Text = "Global Announcement"
annLabel.TextScaled = true
annLabel.Font = Enum.Font.GothamBold
annLabel.TextColor3 = Color3.new(1,1,1)
annLabel.TextXAlignment = Enum.TextXAlignment.Left
annLabel.Parent = annCard
local annInput = Instance.new("TextBox")
annInput.Size = UDim2.new(1, -14, 0, 40)
annInput.Position = UDim2.new(0, 7, 0, 44)
annInput.BackgroundColor3 = Color3.fromRGB(38,38,46)
annInput.TextColor3 = Color3.new(1,1,1)
annInput.PlaceholderText = "type an announcement…"
annInput.TextScaled = true
annInput.ClearTextOnFocus = false
annInput.Font = Enum.Font.Gotham
annInput.Parent = annCard
Instance.new("UICorner", annInput).CornerRadius = UDim.new(0, 8)
local annSend = Instance.new("TextButton")
annSend.Size = UDim2.new(0, 140, 0, 40)
annSend.Position = UDim2.new(1, -147, 0, 92)
annSend.BackgroundColor3 = Color3.fromRGB(45,90,200)
annSend.TextColor3 = Color3.new(1,1,1)
annSend.TextScaled = true
annSend.Font = Enum.Font.GothamBold
annSend.Text = "Send"
annSend.Parent = annCard
Instance.new("UICorner", annSend).CornerRadius = UDim.new(0, 8)
annSend.MouseButton1Click:Connect(function()
local txt = annInput.Text
if txt and #txt > 0 then
EVT_SEND_ANN:FireServer(txt, nil)
annInput.Text = ""
end
end)
-- Admin page (Server Luck x2)
local abuseCard = Instance.new("Frame")
abuseCard.Size = UDim2.new(1, 0, 0, 140)
abuseCard.BackgroundColor3 = Color3.fromRGB(28,28,36)
abuseCard.Parent = pageAdmin
Instance.new("UICorner", abuseCard).CornerRadius = UDim.new(0, 10)
local abuseTitle = Instance.new("TextLabel")
abuseTitle.BackgroundTransparency = 1
abuseTitle.Size = UDim2.new(1, -14, 0, 28)
abuseTitle.Position = UDim2.new(0, 7, 0, 8)
abuseTitle.Text = "Admin Abuse"
abuseTitle.TextScaled = true
abuseTitle.Font = Enum.Font.GothamBold
abuseTitle.TextColor3 = Color3.new(1,1,1)
abuseTitle.TextXAlignment = Enum.TextXAlignment.Left
abuseTitle.Parent = abuseCard
local luckBtn = Instance.new("TextButton")
luckBtn.Size = UDim2.new(1, -14, 0, 44)
luckBtn.Position = UDim2.new(0, 7, 0, 48)
luckBtn.BackgroundColor3 = Color3.fromRGB(70,160,80)
luckBtn.TextColor3 = Color3.new(1,1,1)
luckBtn.TextScaled = true
luckBtn.Font = Enum.Font.GothamBold
luckBtn.Text = "Server Luck ×2 (stacks, resets 5:00)"
luckBtn.Parent = abuseCard
Instance.new("UICorner", luckBtn).CornerRadius = UDim.new(0, 8)
luckBtn.MouseButton1Click:Connect(function()
EVT_ADMIN_ACT:FireServer("DoubleLuck")
end)
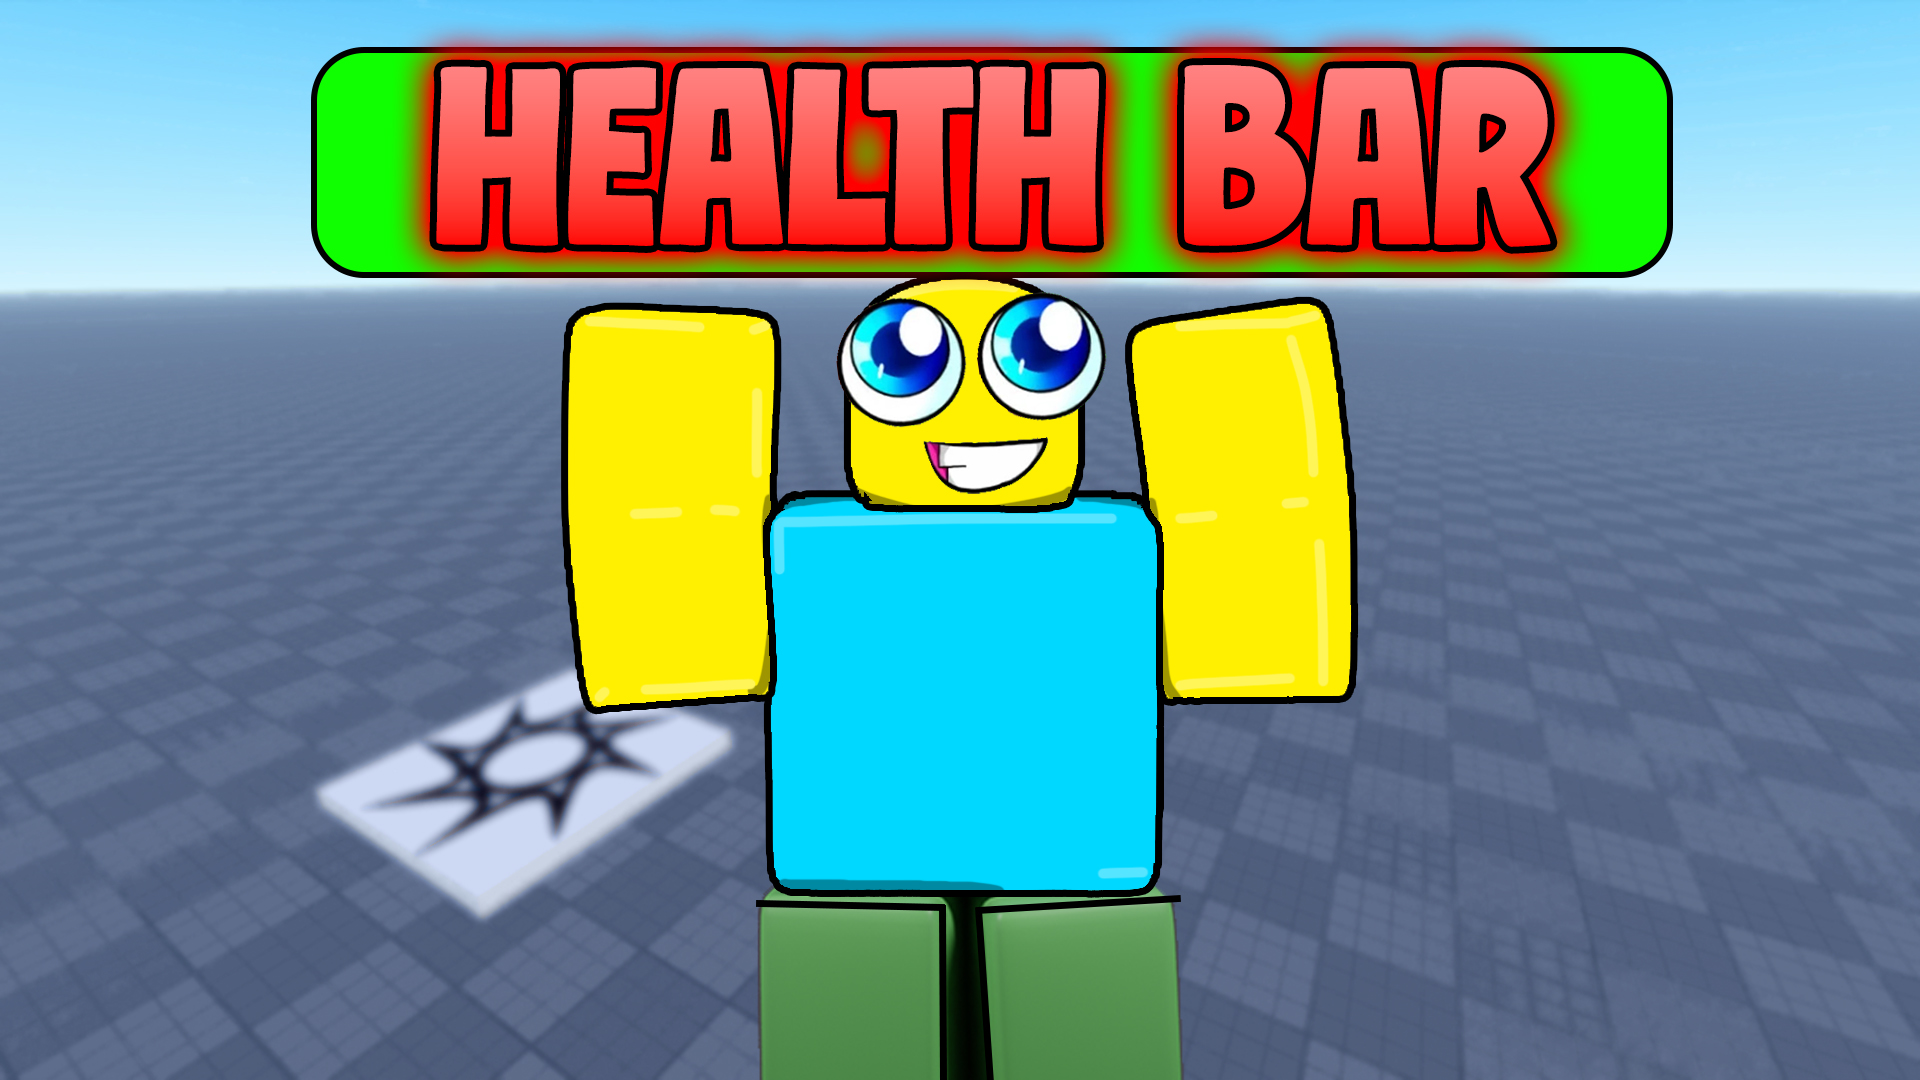
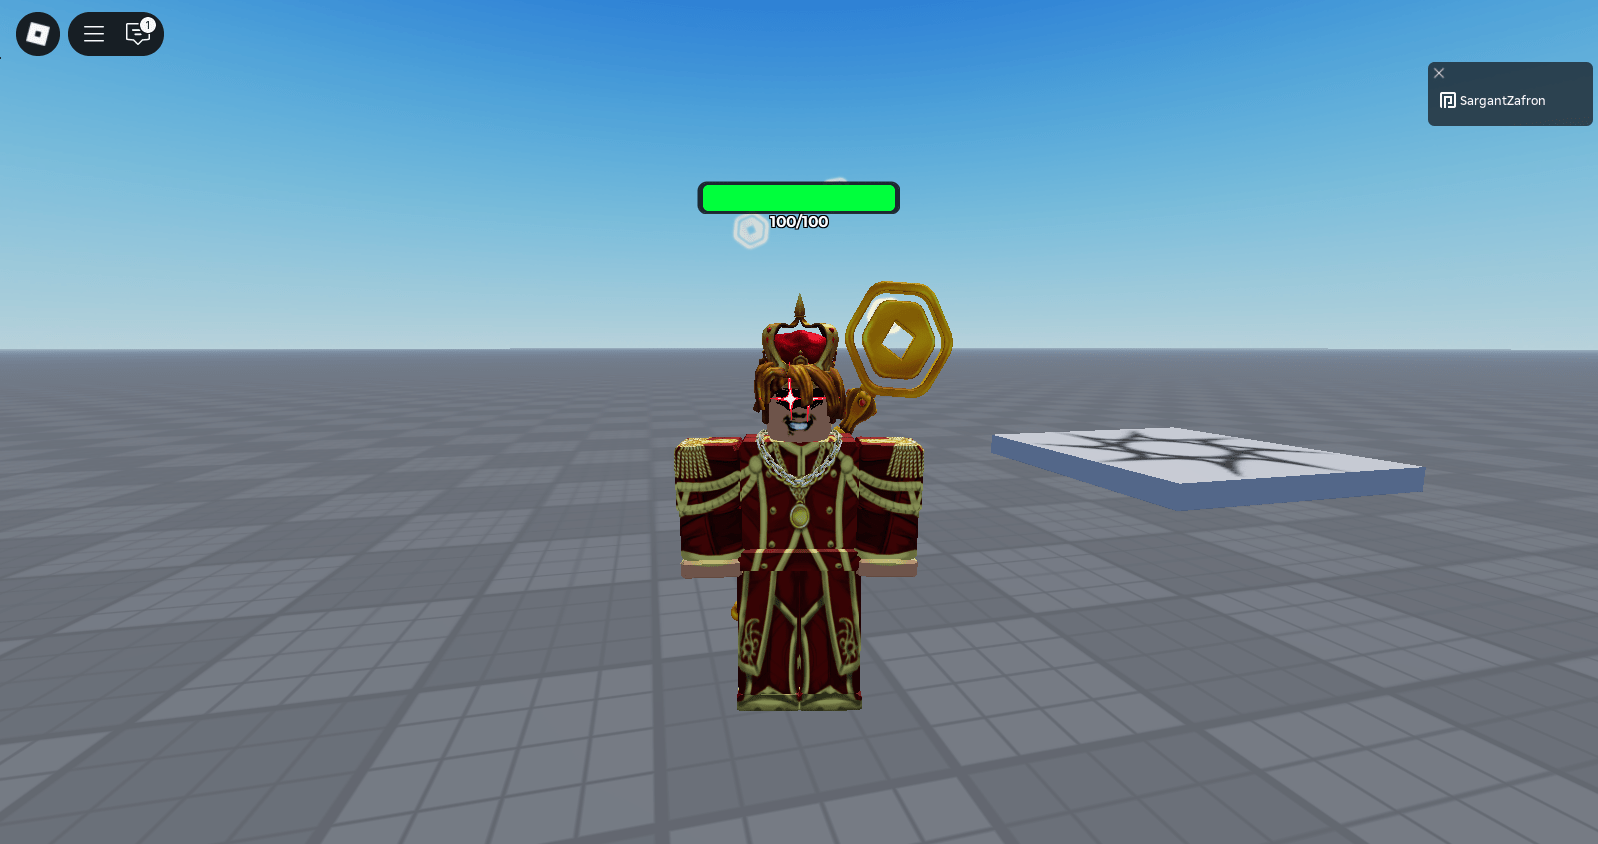
-- ========= Luck HUD (bottom-right) =========
local hud = Instance.new("ScreenGui")
hud.Name = "LuckHUD"
hud.IgnoreGuiInset = true
hud.ResetOnSpawn = false
hud.DisplayOrder = 1100
hud.Parent = player.PlayerGui
local hudFrame = Instance.new("Frame")
hudFrame.Size = UDim2.new(0, 210, 0, 60)
hudFrame.Position = UDim2.new(1, -220, 1, -70)
hudFrame.BackgroundColor3 = Color3.fromRGB(26,26,32)
hudFrame.Visible = false
hudFrame.Parent = hud
Instance.new("UICorner", hudFrame).CornerRadius = UDim.new(0, 10)
local hudLabel = Instance.new("TextLabel")
hudLabel.BackgroundTransparency = 1
hudLabel.Size = UDim2.new(1, -16, 0, 24)
hudLabel.Position = UDim2.new(0, 8, 0, 6)
hudLabel.Font = Enum.Font.GothamBold
hudLabel.TextScaled = true
hudLabel.TextColor3 = Color3.fromRGB(120, 220, 120) -- green
hudLabel.Text = "luck"
hudLabel.Parent = hudFrame
local hudTimer = Instance.new("TextLabel")
hudTimer.BackgroundTransparency = 1
hudTimer.Size = UDim2.new(1, -16, 0, 22)
hudTimer.Position = UDim2.new(0, 8, 0, 32)
hudTimer.Font = Enum.Font.Gotham
hudTimer.TextScaled = true
hudTimer.TextColor3 = Color3.fromRGB(220,220,230)
hudTimer.Text = "00:00"
hudTimer.Parent = hudFrame
local currentMult, secondsLeft = 1, 0
local lastTick = 0
local function fmtTime(s)
s = math.max(0, math.floor(s))
return string.format("%02d:%02d", math.floor(s/60), s%60)
end
local function refreshHUD()
if secondsLeft > 0 and currentMult > 1 then
hudFrame.Visible = true
hudLabel.Text = ("luck x%d"):format(currentMult)
hudTimer.Text = fmtTime(secondsLeft)
else
hudFrame.Visible = false
end
end
EVT_LUCK_PUSH.OnClientEvent:Connect(function(mult, secs)
currentMult, secondsLeft = mult, secs
refreshHUD()
end)
RunService.RenderStepped:Connect(function(dt)
if secondsLeft > 0 then
secondsLeft = math.max(0, secondsLeft - dt)
if math.floor(secondsLeft) ~= lastTick then
lastTick = math.floor(secondsLeft)
refreshHUD()
end
end
end)
-- ========= Bottom drag bar (flat white) =========
local dragBar = Instance.new("Frame")
dragBar.Size = UDim2.new(1, 0, 0, 8)
dragBar.Position = UDim2.new(0, 0, 1, -8)
dragBar.BackgroundColor3 = Color3.fromRGB(255,255,255)
dragBar.Parent = panel
local function makeDraggable(handle, target)
local dragging, dragStart, startPos = false, nil, nil
local function update(input)
local delta = input.Position - dragStart
target.Position = UDim2.fromOffset(startPos.X.Offset + delta.X, startPos.Y.Offset + delta.Y)
end
handle.InputBegan:Connect(function(input)
if input.UserInputType == Enum.UserInputType.MouseButton1 or input.UserInputType == Enum.UserInputType.Touch then
dragging = true
dragStart = input.Position
startPos = target.Position
input.Changed:Connect(function()
if input.UserInputState == Enum.UserInputState.End then dragging = false end
end)
end
end)
handle.InputChanged:Connect(function(input)
if dragging and (input.UserInputType == Enum.UserInputType.MouseMovement or input.UserInputType == Enum.UserInputType.Touch) then
update(input)
end
end)
end
makeDraggable(dragBar, panel)
-- Toggle panel with F2
UserInputService.InputBegan:Connect(function(input, gpe)
if gpe then return end
if input.KeyCode == Enum.KeyCode.F2 then
gui.Enabled = not gui.Enabled
end
end)How it works & quick test
- Toast popup: appears slightly above center for 2s; used for global announcements and luck notifications.
- F2 control panel: two tabs — Announcement (sends toast) and Admin (triggers Server Luck ×2).
- Luck ×2 (stacks): doubles multiplier and resets to 5:00 each click; HUD shows luck ×N and counts down.
- Studio: no DataStore/Messaging calls; safe local behavior.
- Live game: MessagingService + DataStore sync luck state across all servers and persist between restarts until expiry.
Test flow
- Create the four RemoteEvents and three scripts as named above.
- Press Play → tap F2 to open the panel.
- Send an announcement → everyone sees the toast.
- Click Server Luck ×2 → toast turns green, HUD appears with 5:00 and decrements.
Going live (API services)
- File → Publish to Roblox.
- Game Settings → Security → enable API Services for Studio testing if needed.
- Start multiple servers/players; clicking Luck ×2 on one server updates all.
Docs: Publishing,
DataStoreService,
MessagingService.
Related Roblox Studio guides